常用消息机制
安卓有很多消息传递机制,基于不用使用场景,我们会采用对应的消息传递机制,而无论是那种消息传递机制,都是按照消息发送者和消息接收者这个进行设计的,以下是我们在不同场景下会选择的消息传送机制;
同一app内部的同一组件内的消息通信(单个或多个线程之间) ;
常用方法:Message Handler/Message Loop
原理图:
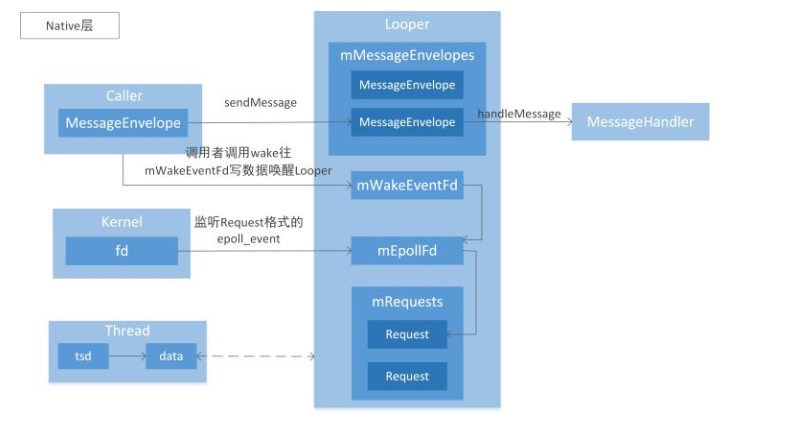
MessageQueue流程:
- Looper 通过addFd 添加文件管道监听和事件回调;
- 当文件监听到消息后,handler通过dispatchMessage进行消息派发,Looper->sendMessage;
- 收到消息后走到Handler的handleMessgae,进行消息处理
同一app内部的不同组件之间的消息通信(单个进程)
常用方法:EventBus
原理图:

EventBus流程:
还没有接触使用过,暂时不讲,是安卓的一种轻量级的事件通知机制;
其他
同一app具有多个进程的不同组件之间的消息通信
不同app之间的组件之间消息通信
Android 系统在特定情况下与App之间的消息通信
常用方法:PendingIntent
原理图:
** 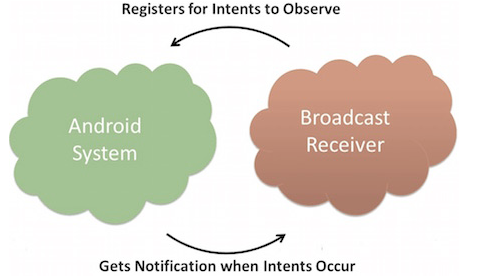
BroadCast流程:
- 将Intentfliter跟receiver绑定,可通过静态方式:在AndroidManifest.xml 进行配置,也可以动态方式,registerReceiver;
- Brastcast先打包Intent,然后通过sendBrocast,进行广播;
- recevier接受到对应的广播在onReceive中走处理流程;
闹钟app也是依托这些广播的机制进行运作;以下我们会对闹钟设置与闹钟响应的流程进行简单的介绍;
DeskClock APP
代码路径:packages/apps/DeskClock
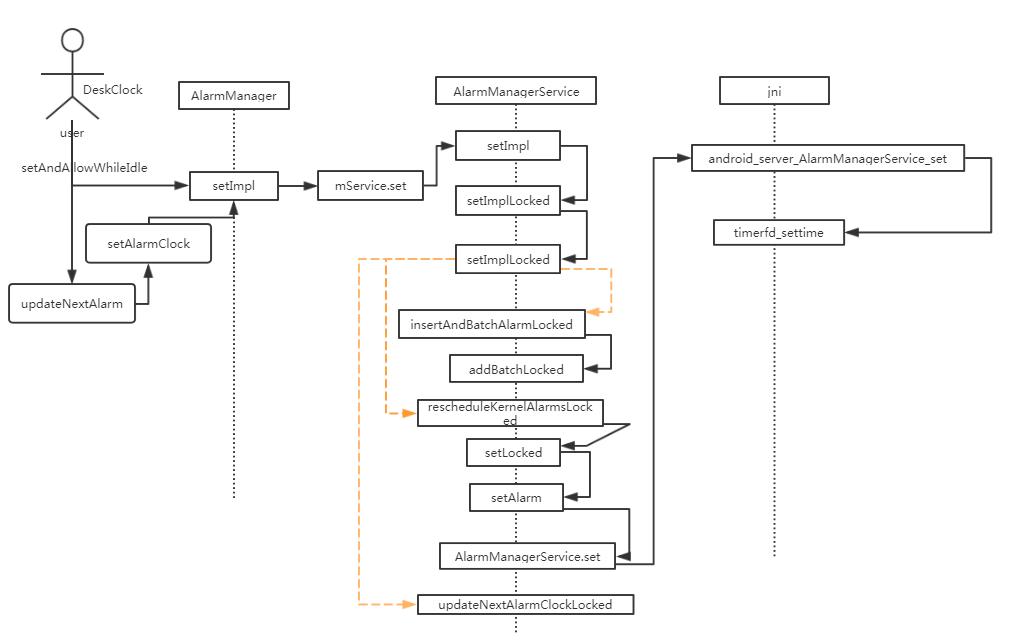
设置闹钟流程:
1 | 当用户点击选择相应的闹钟后: |
pendingIntent:等待着的Intent获取pendingIntent有以下方法,getActivity:(用于启动一个Activity的pendingIntent); getBroadcast(方法从系统取得一个用于向BrocastReceiver的Intent广播的PendingIntent); getService(用于启动一个Service的pendingIntent)分别对应着3个行为,跳转到一个activity组件,打开一个广播组件和打开一个服务组件;
如上发起端DeskClock通过PendingIntent.getService会在到在AMS中得到PendingIntentRecord对象,当对应的闹钟事件到来时,AlarmManagerService会通过传递的PendingIntent对象中的send方法发起回调,从而做出执行对应的动作;
通过am的set方法设置后,当闹钟时间来临的时候;就会触发下面的响应流程;
闹钟响应流程:
1 |
|
注意事项:
一:闹钟响应流程中睡眠
从DeskClock应用行为我们也可以看到在应用写闹钟处理函数的时候,需要进行持锁,尤其在耗时较长的操作中;避免还没有进入处理函数,就因为autoSleep进程没有disable从而进入休眠;另外对于在休眠过程中需要唤醒系统的应用来说setExactAndAllowWhileIdle,旧版本setExact在系统处于Doze的时候,同样会被忽略;
二:setForeground问题:
当API从25升至28时,会出现前台服务设置异常问题,修复如下:
一:针对Permission Denial: startForeground ,AndroidManifest.xml需添加属性
1 | + <uses-permission android:name="android.permission.FOREGROUND_SERVICE" /> |
二:针对invalid channel for service notification,需进行channel创建,如下所示:
1 | NotificationChannel notificationChannel = new NotificationChannel( |
三:应用在后台的时候PendingIntent 无法startService,所以上述代码流程闹钟应用在后台是不正常的;
- android提供了一套JobIntentService的机制,对于响应不是很及时的可以改成这种接口;
- 可将PendingIntent改写为BrocastRecevicer然后在OnReceive中startForegroundService将service带到前台;前台服务的创建需要注意两个细节,可参考此文档Android8.0使用通知创建前台服务
1 | 一:Pending改成以下形式 |
AlarmManager
主要代码分布:
core/java/android/app/AlarmManager.java
services/core/java/com/android/server/AlarmManagerService.java
services/core/jni/com_android_server_AlarmManagerService.cpp
安卓是怎么实现对闹钟进行监听和注册,分发的呢?
闹钟的监听
SystemServer在startOtherServices时,会调用SystemServiceManager中的startService,此时AlarmManagerService中的onStart函数就会被调用;
1 | public void onStart() { |
在start初始化的时候,我们主要注意的是init流程里面建立的对alarm事件的监听,以及在AlarmThread里面对闹钟时间的响应;
1 |
|
闹钟的注册
接回apk设置alarm流程往下梳理注册流程:
1 | apk调用: |
我们这里主要关注两个参数:flag和type
flag讲解:
flag主要影响的是idle状态是否需要唤醒
1 | 1.FLAG_STANDALONE = 1;用于标识该alarm不会被加入到其他alarm集合中去; |
TYPE讲解:
应用能设置的类型为:RTC_WAKEUP,RTC,ELAPSED_REALTIME_WAKEUP,ELAPSED_REALTIME.这四种;
但是在AlarmManagerService会RTC类型的时间进行转换,convertToElapsed,最终设置的类型转换成ELAPSED_REALTIME类型,所以将闹钟的类型只有ELAPSED_REALTIME_WAKEUP,ELAPSED_REALTIME;
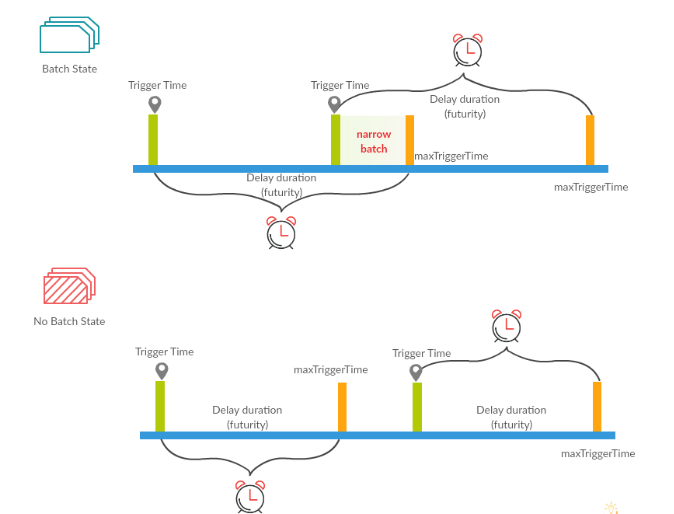
流程总结:
1 | 1.set流程里面会权限进行检查,根据是否为系统应用或者白名单里面的应用,对flag进行调整; |
如图为batch的形成过程:
闹钟时间分发
对于时间事件的分发,我们主要看AlarmThread
1 | private class AlarmThread extends Thread |
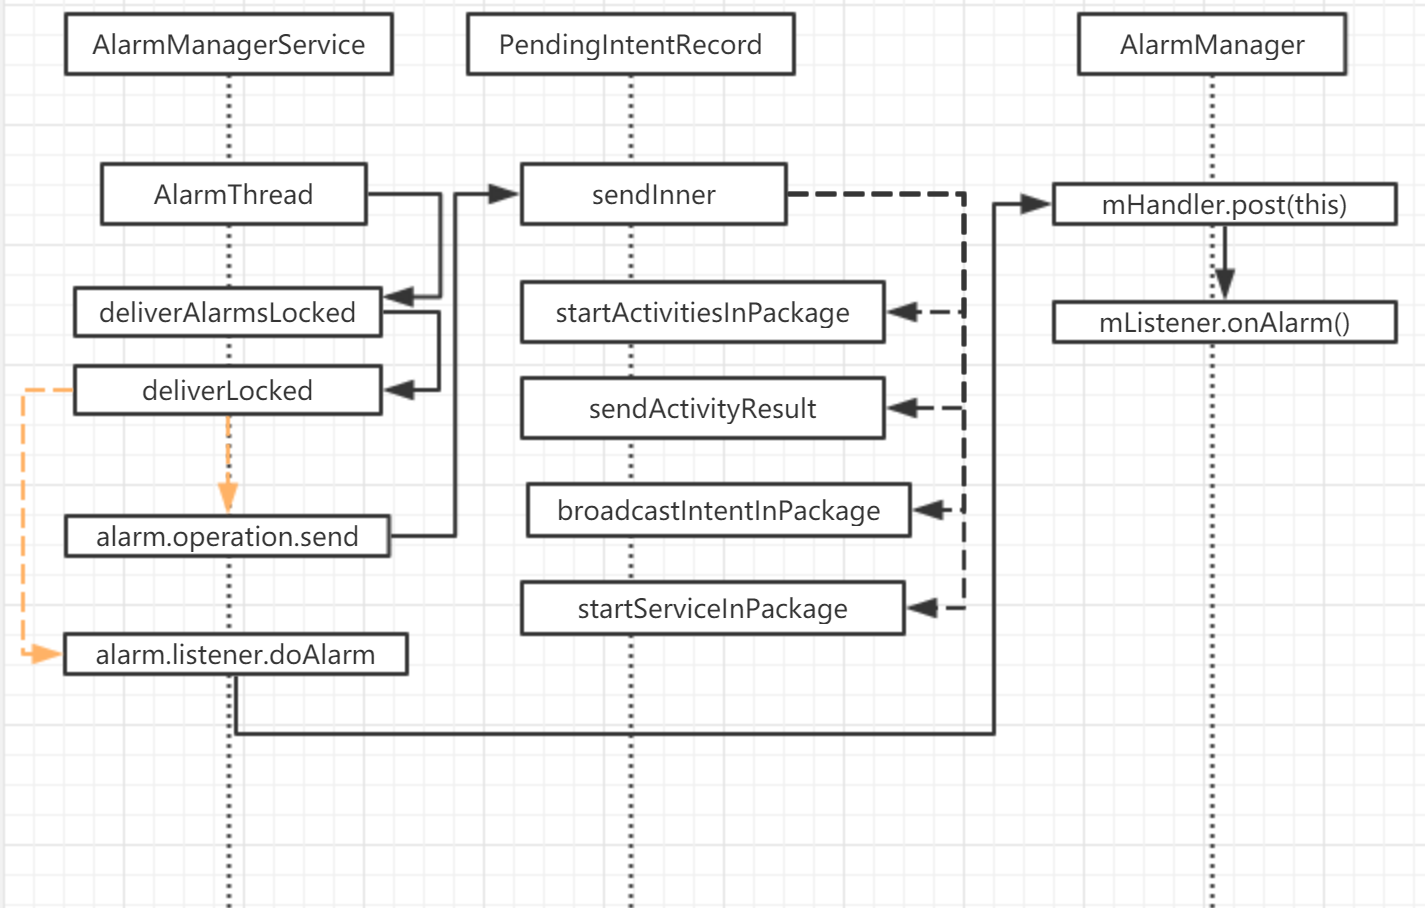
Alarm消息的传递流程如下所示,如果设置的时候传入的是PendingIntent则会进入send流程,如果设置的时候传入的是Listener那么就会走到onAlarm的流程;
内核闹钟流程
当用户层设置闹钟的时候,内核不会马上设置到RTC寄存器;而是在suspend的时候从队列里面取出最早的时钟,然后设置进去;通过trace我们就能直接看出这种关系来
1 | timerfd_settime |
关机闹钟的实现
当梳理完应用到内核的完整路径后,我们就可以借助这套机制完成我们的所要的需求;
这里主要利用的有两点:
一:DeskClock这类的闹钟应用在设置闹钟的时候会把AlarmClockInfo闹钟信息保存在系统中;此时,我们会将闹钟信息保存,当关机的时候再设置到RTC寄存器中;
1 | private void updateNextAlarmInfoForUserLocked(int userId, |
二:timerfd和epoll_wait,在关机充电的时候,需要判断关机时间到来,当闹钟时间到的时候;我们会重启系统;进入android;
关键代码:
1 | void *alarm_thread_handler(void *arg) |
其他
系统时间设置与RTC时间
1 | 在启动或者联网的时候,安卓会帮我们将网络时间设置到RTC中,前面的过程我们先跳过直接讲最后的 |
代办
谷歌闹钟管理优化梳理;