双屏异显异触流程

异显apk分析

在安卓的SDK中有线程的ApiDemo提供给我们去参考设计

目录为:development/samples/ApiDemos/src/com/example/android/apis/app/PresentationActivity.java

1
2
3
4
5
6
7
8
9
10
11
12
13
14
15
16
17
18
19
20
21
22
23
24
25
26
27
28
29
30
31
32
33
34
35
36
37
38
39
40
41
42
43
44
45
46
47
48
49
50
 public void onCheckedChanged(CompoundButton buttonView, boolean isChecked) {
if (buttonView == mShowAllDisplaysCheckbox) {
// Show all displays checkbox was toggled.
mDisplayListAdapter.updateContents();
} else {
// Display item checkbox was toggled.
final Display display = (Display)buttonView.getTag();
if (isChecked) {
DemoPresentationContents contents = new DemoPresentationContents(getNextPhoto());
showPresentation(display, contents);
} else {
hidePresentation(display);
}
mDisplayListAdapter.updateContents();
}
}
private final static class DemoPresentationSurfaceView extends Presentation {
private GLSurfaceView mSurfaceView;
private final String TAG = "DemoPresentationActivity";
public DemoPresentationSurfaceView(Context context, Display display) {
super(context, display);
}

@Override
protected void onCreate(Bundle savedInstanceState) {
// Be sure to call the super class.
super.onCreate(savedInstanceState);

// Get the resources for the context of the presentation.
// Notice that we are getting the resources from the context of the presentation.
Resources r = getContext().getResources();

// Inflate the layout.
setContentView(R.layout.presentation_with_media_router_content);

// Set up the surface view for visual interest.
mSurfaceView = (GLSurfaceView)findViewById(R.id.surface_view);
mSurfaceView.setRenderer(new CubeRenderer(false));
final Button button = (Button)findViewById(R.id.textbutton);
button.setOnClickListener(new View.OnClickListener() {
public void onClick(View v) {
Log.d(TAG, "There are currently zhuangnanjian");
}
});
}

public GLSurfaceView getSurfaceView() {
return mSurfaceView;
}
}

这是通过Button的ID去选择哪个显示设备;安卓还提供了另外两种可以获取Presentation的方法

一:通过Media router去获取首选的设备和显示presentation

1
2
3
4
5
mMediaRouter = (MediaRouter)getSystemService(Context.MEDIA_ROUTER_SERVICE);
MediaRouter.RouteInfo route = mMediaRouter.getSelectedRoute(MediaRouter.ROUTE_TYPE_LIVE_VIDEO);
Display presentation = route != null ? route.getPresentationDisplay() :null;
presentation.show();
presentation.setOnDismissListener(mOnDismissListener);

除了ROUTE_TYPE_LIVE_VIDEO,还有ROUTE_TYPE_REMOTE_DISPLAY,ROUTE_TYPE_USER

二:使用displayManager获取

1
2
3
4
5
6
Display[]presentationDisplays = mDisplayManager.getDisplays(DisplayManager.DISPLAY_CATEGORY_PRESENTATION);
Display display = presentationDisplays[0];
final int displayId = display.getDisplayId();
Display display = presentationDisplays[0];
Presentation presentation = new MyPresentation(context, presentationDisplay);
presentation.show();

支持的类型如下:

1571399167593

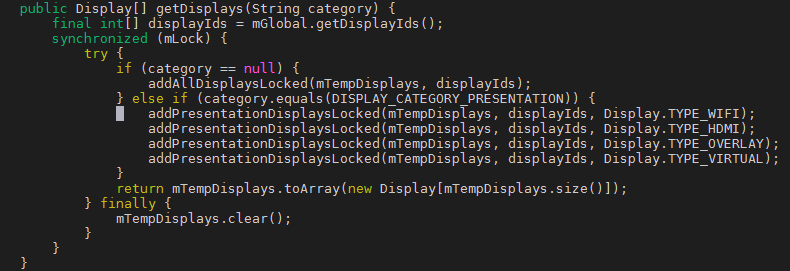
综上为三种创建Presentation对象方法,一:直接指定DisplayId,创建Presentation对象;二:通过MediaRoute获取Presentation对象 三:通过displayManager获取Display对象,获取DisplayId,然后创建Presentation对象;然后调用Presentation的show函数

接下来我们就进入framework看下这个对象和相关的show函数

Presentation&&show

Presenation结构体

1
2
3
4
5
6
7
8
9
10
11
12
13
14
15
16
17
18
19
20
21
22
23
24
25
26
27
28
29
30
31
32
33
34
35
36
37
38
39
40
41
42
43
44
45
46
47
48
49
50
public Presentation(Context outerContext, Display display, int theme) {              
super(createPresentationContext(outerContext, display, theme), theme, false); //调用dialog的构造函数

mDisplay = display;
mDisplayManager = (DisplayManager)getContext().getSystemService(DISPLAY_SERVICE);

final Window w = getWindow();
final WindowManager.LayoutParams attr = w.getAttributes();
attr.token = mToken;
w.setAttributes(attr);
w.setGravity(Gravity.FILL);
w.setType(TYPE_PRESENTATION);
setCanceledOnTouchOutside(false);
}

private static Context createPresentationContext(
Context outerContext, Display display, int theme) {
if (outerContext == null) {
throw new IllegalArgumentException("outerContext must not be null");
}
if (display == null) {
throw new IllegalArgumentException("display must not be null");
}

Context displayContext = outerContext.createDisplayContext(display);
if (theme == 0) {
TypedValue outValue = new TypedValue();
displayContext.getTheme().resolveAttribute(
com.android.internal.R.attr.presentationTheme, outValue, true);
theme = outValue.resourceId;
}

// Derive the display's window manager from the outer window manager.
// We do this because the outer window manager have some extra information
// such as the parent window, which is important if the presentation uses
// an application window type.
final WindowManagerImpl outerWindowManager =
(WindowManagerImpl)outerContext.getSystemService(WINDOW_SERVICE);
final WindowManagerImpl displayWindowManager =
outerWindowManager.createPresentationWindowManager(displayContext);
return new ContextThemeWrapper(displayContext, theme) {
@Override
public Object getSystemService(String name) {
if (WINDOW_SERVICE.equals(name)) {
return displayWindowManager;
}
return super.getSystemService(name);
}
};
}

Presentation继承自Dialog,获取到Presentation要显示的设备后,就要将Activity的context对象和设备信息作为参数来创建Presentation对象;将设备记录在成员变量mDisplay中,将Presentation设置为不可在外部点击取消;

show流程

1571476950445

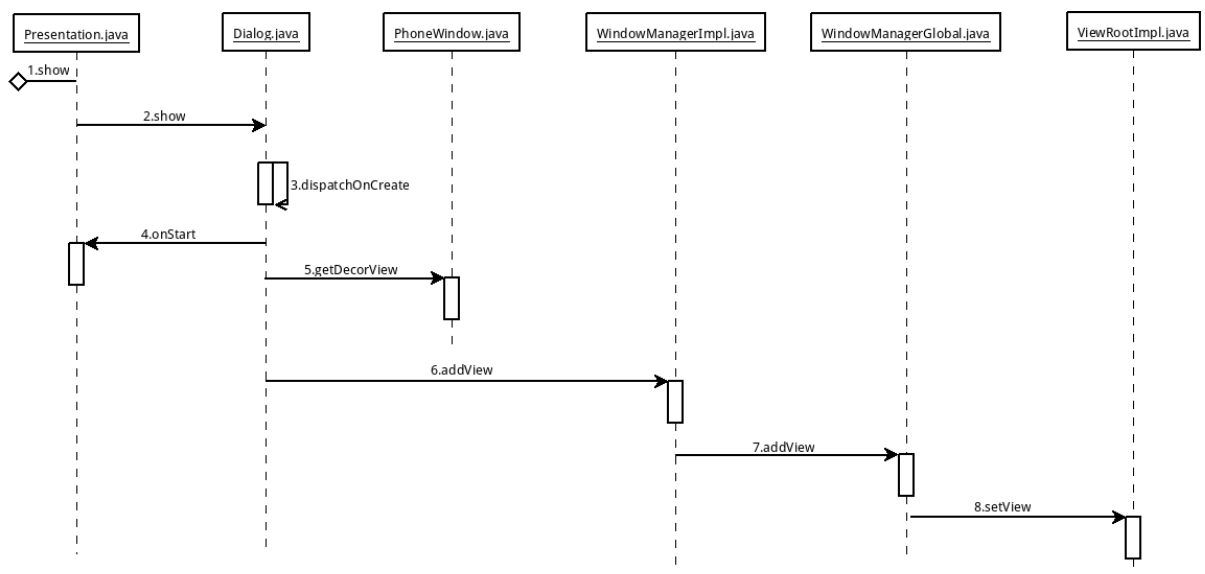
创建ViewRoot并将view添加到链表上

1
2
3
4
5
6
7
public void setView(View view, WindowManager.LayoutParams attrs, View panelParentView) {
...
res = mWindowSession.addToDisplay(mWindow, mSeq, mWindowAttributes,
getHostVisibility(), mDisplay.getDisplayId(), mTmpFrame,
mAttachInfo.mContentInsets, mAttachInfo.mStableInsets,
mAttachInfo.mOutsets, mAttachInfo.mDisplayCutout, mInputChannel,
mTempInsets);

setView的作用主要有两个:一:创建InputChannel来接受输入事件;二:将Window加入到WindowManager

输入事件的传递

输入设备类型

从InputReader.h我们可以看出来,安卓将输入设备分为以下几种类型:

开关:SwitchInputMapper

震动器,严格意义上是输出设备:VibratorInputMapper

鼠标:CursorInputMapper

键盘:KeyboardInputMapper

触摸设备 TouchInputMapper,SingleTouchInputMapper,MultiTouchInputMapper,

触控笔ExternalStylusInputMapper,

游戏杆:JoystickInputMapper

input设备不同初始化参数也不一样如触摸设备的话可以配置displayId,而鼠标则只能输出到主显;

touch.displayId的配置流程

1
2
3
4
5
6
7
8
9
10
11
12
13
14
15
16
17
18
19
20
services/inputflinger/InputReader.cpp
void InputReader::loopOnce() {
processEventsLocked(mEventBuffer, count);
addDeviceLocked(rawEvent->when, rawEvent->deviceId);
device->configure(when, &mConfig, 0);
configureParameters()


if (mParameters.orientationAware
|| mParameters.deviceType == Parameters::DEVICE_TYPE_TOUCH_SCREEN
|| mParameters.deviceType == Parameters::DEVICE_TYPE_POINTER) {
mParameters.hasAssociatedDisplay = true;
if (mParameters.deviceType == Parameters::DEVICE_TYPE_TOUCH_SCREEN) {
mParameters.associatedDisplayIsExternal = getDevice()->isExternal();
String8 uniqueDisplayId;
getDevice()->getConfiguration().tryGetProperty(String8("touch.displayId"),
uniqueDisplayId);
mParameters.uniqueDisplayId = uniqueDisplayId.c_str();
}
}

touch.displayId的传递流程

1
2
3
4
5
6
7
8
9
10
11
12
13
14
15
16
17
18
19
20
21
22
23
24
25
26
27
28
29
30
31
32
33
34
35
36
37
38
39
40
41
42
43
44
45
46
47
48
49
50
51
52
53
54
services/inputflinger/InputReader.cpp
void TouchInputMapper::dispatchMotion
const int32_t displayId = getAssociatedDisplay().value_or(ADISPLAY_ID_NONE);
pointerProperties[pointerCount].copyFrom(properties[index]);
pointerCoords[pointerCount].copyFrom(coords[index]);
std::optional<int32_t> TouchInputMapper::getAssociatedDisplay() {
if (mParameters.hasAssociatedDisplay) {
if (mDeviceMode == DEVICE_MODE_POINTER) {
return std::make_optional(mPointerController->getDisplayId());
} else {
return std::make_optional(mViewport.displayId);
}
}
return std::nullopt;
}
NotifyMotionArgs args(mContext->getNextSequenceNum(), when, deviceId,
source, displayId, policyFlags,
action, actionButton, flags, metaState, buttonState, MotionClassification::NONE,
edgeFlags, deviceTimestamp, pointerCount, pointerProperties, pointerCoords,
xPrecision, yPrecision, downTime, std::move(frames));
getListener()->notifyMotion(&args);

压入队列里面然后在read 的loopOnce中会进行通知
services/inputflinger/InputListener.cpp
void QueuedInputListener::notifyConfigurationChanged(
const NotifyConfigurationChangedArgs* args) {
mArgsQueue.push(new NotifyConfigurationChangedArgs(*args));
}

void InputReader::loopOnce() {
...
mQueuedListener->flush();
args->notify(mInnerListener);
...
}
在InputDispatcher中同样是用的一个线程找到对应的窗口进行分发
services/inputflinger/InputDispatcher.cpp
void InputDispatcher::notifyMotion(const NotifyMotionArgs* args) {
...
needWake = enqueueInboundEventLocked(newEntry);
mPolicy->interceptMotionBeforeQueueing(args->eventTime, /*byref*/ policyFlags);
...
}
bool InputDispatcherThread::threadLoop() {
...
mDispatcher->dispatchOnce();
-->mLooper->pollOnce(timeoutMillis);
-->dispatchOnceInnerLocked(&nextWakeupTime);
-->done = dispatchMotionLocked(currentTime, typedEntry,
&dropReason, nextWakeupTime);
findTouchedWindowTargetsLocked
dispatchEventLocked(currentTime, entry, inputTargets);
...
}

从软件流程分析,touchScreen类型的话是通过配置device.internal来配置TP的输入设备输出到辅显,而Pointer类型的话则是通过displayId去设置输出的方向;

idc文件配置

idc(Input Device Configuration)为输入设备配置文件,包含设备具体的配置属性,这些属性影响输入设备的行为,常见的配置有;

1
2
3
4
5
6
device.internal 指定输入设备属于内置组件;还是外部链接(很可能拆卸)的外围设备;0表示外部,1表示内部
touch.deviceType touchScreen(与显示屏相关的触摸屏),touchPad(不与显示相关连的触摸板), touchNavigation,pointer(类似于鼠标),default(系统根据分类算法自动检测设备类型)
touch.orientationAware 等于1时表示触摸会随着显示屏方向更改,为0则表示不受显示屏方向更改的影响
touch.gestureMode single-touch multi-touch default
touch.wake tp是否需要唤醒系统,一般希望外部设备才有这种能力;如果是内部的设备需要唤醒系统,你也可以进行配置
...

从代码流程上看,在双屏异触的场景下,如果是两个TP,需要配置一个为内部设备,一个为外部设备;

由于安卓的默认鼠标设备的DisplayId只能是0,如代码所示:

1
2
3
4
5
6
7
8
9
10
11
12
13
14
15
16
17
18
19
20
21
22
23
24
25
26
27
28
29
30
31
32
void CursorInputMapper::sync(nsecs_t when) {
...
if (mSource == AINPUT_SOURCE_MOUSE) {
if (moved || scrolled || buttonsChanged) {
mPointerController->setPresentation(
PointerControllerInterface::PRESENTATION_POINTER);

if (moved) {
mPointerController->move(deltaX, deltaY);
}

if (buttonsChanged) {
mPointerController->setButtonState(currentButtonState);
}

mPointerController->unfade(PointerControllerInterface::TRANSITION_IMMEDIATE);
}

float x, y;
mPointerController->getPosition(&x, &y);
pointerCoords.setAxisValue(AMOTION_EVENT_AXIS_X, x);
pointerCoords.setAxisValue(AMOTION_EVENT_AXIS_Y, y);
pointerCoords.setAxisValue(AMOTION_EVENT_AXIS_RELATIVE_X, deltaX);
pointerCoords.setAxisValue(AMOTION_EVENT_AXIS_RELATIVE_Y, deltaY);
displayId = ADISPLAY_ID_DEFAULT;
} else {
pointerCoords.setAxisValue(AMOTION_EVENT_AXIS_X, deltaX);
pointerCoords.setAxisValue(AMOTION_EVENT_AXIS_Y, deltaY);
displayId = ADISPLAY_ID_NONE;
}
...
}

如果想要让鼠标设备支持输出到辅显也可以改变这个displayId,并且需要修改framework/base下对于鼠标控件sprite Layer的LayerStack属性的设置;笔者的话是通过鼠标在主显响应,触摸在辅屏响应来实现双屏异显异触的验证,那么这样其实可以配置;

1
2
3
system/usr/idc/gslX680.idc
device.internal = 0
touch.deviceType = touch

总结:作为应用,需要指定送显时候的displayId;作为输入设备也需要指定

参考链接

Android折叠屏适配攻略

聊聊安卓折叠屏给交互设计和开发带来的变化

Android开发-双屏异显(Presentation)实现

手把手带你深入浅出神秘的设计模式

Android7.1 Presentation双屏异显原理分析

输入输出设备配置文件

Android触摸事件传递

Android Input of Pointer Location

Android双屏分析

输入事件是怎么分发到目标窗口的